JPG, PNG, or WebP? A No-Jargon Guide

Most slow small business websites share one quiet culprit: photos uploaded straight from a phone or a stock library, in whatever format they arrived. This guide skips the theory and starts from a test we ran ourselves, one photo saved three ways with an 8.5x size difference between them. You will learn what JPEG, PNG, WebP, and SVG are each actually for, the five second decision rule, the free tool that converts anything, and the three checks that prove your fix worked.
We saved the same 1600 pixel photo three ways while writing this post. As a PNG it weighed 2,828 KB. As a JPEG at quality 80 it weighed 464 KB. As a WebP at quality 80 it weighed 330 KB. On screen the three are indistinguishable. That is not a rounding error, it is an 8.5x difference in how long your visitor stares at a blank rectangle, and it is decided by nothing more than the format you picked in the save dialog.
If your site feels slow, oversized images are the most likely cause and the easiest fix. You do not need a developer or a plugin. You need twenty minutes and the five steps below.
Step 1: Learn what each format is for
There are really only four formats you need to care about, and each has one job. JPEG compresses photographs well by throwing away detail your eye barely notices. PNG stores every pixel exactly, which is perfect for screenshots and graphics but disastrous for photos. WebP is the modern all-rounder that does both jobs in a smaller file and is supported by every current browser. SVG is for logos and icons: it is a drawing recipe rather than a grid of pixels, so it stays razor sharp at any size.
| You are saving a... | Best pick | Also fine | Avoid |
|---|---|---|---|
| Photo (people, food, places) | WebP, quality 75 to 85 | JPEG, quality 80 | PNG |
| Logo or flat graphic | SVG if you have it | PNG or lossless WebP | JPEG |
| Screenshot with text | PNG | Lossless WebP | Low quality JPEG |
| Image needing transparency | PNG or WebP | SVG for graphics | JPEG (none at all) |
One nuance worth knowing: the newer AVIF format compresses photos another 20 to 30 percent beyond WebP, but browser support in 2026 still sits around 93 percent versus effectively universal for WebP, and it is slower to create. WebP is the safe default; AVIF is an optimization for later.
Step 2: See the difference on a real photo
Numbers in a table are easy to shrug off, so here is the test we ran for this post. One stock photo of plated food, 1600 by 1067 pixels, saved three times with the same tool and nothing else changed:
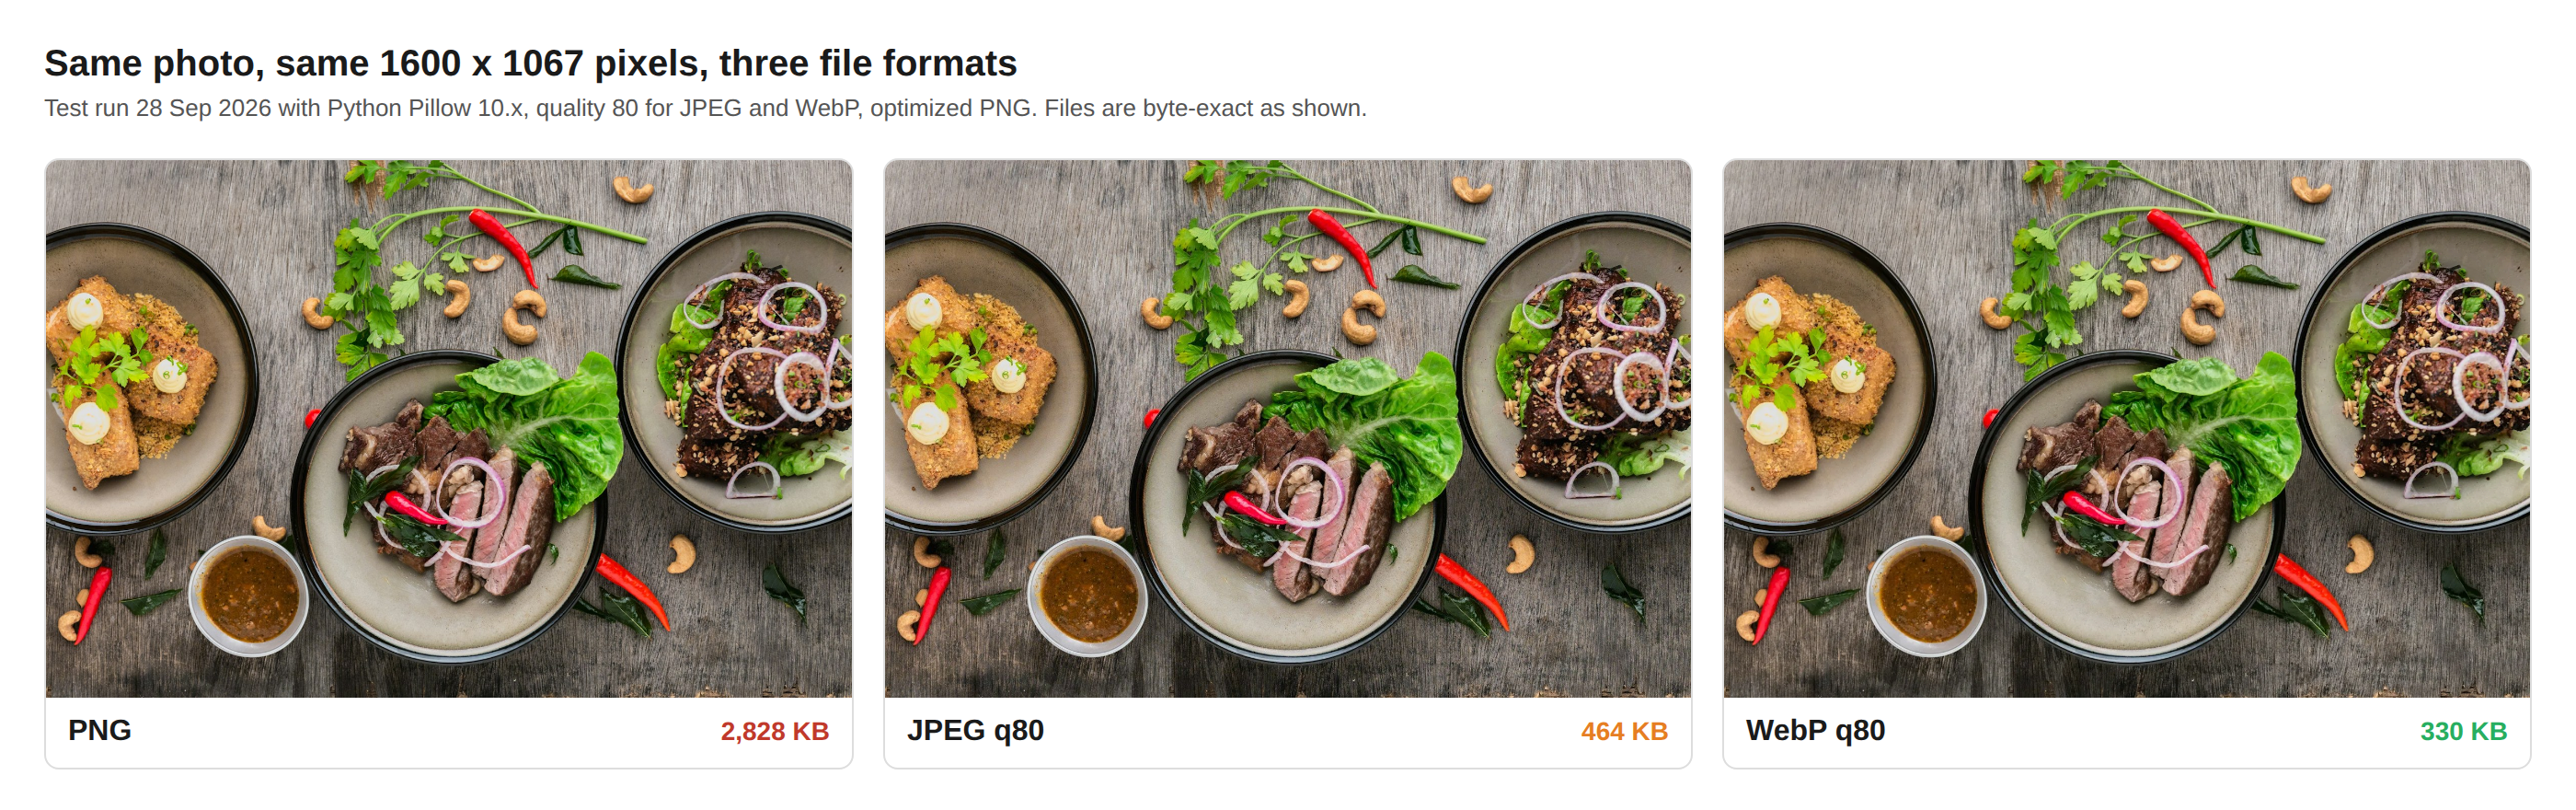
The PNG is not higher quality in any way a human can see. It is simply the wrong tool: PNG refuses to throw away photographic detail, so it stores noise, grain, and gradients pixel by pixel. Every visitor to a page with that PNG downloads 2.5 MB of nothing.
Now the twist that surprises most people. We also saved a simple flat logo graphic both ways, and the result flipped: the PNG was 3.9 KB while the JPEG was 14.8 KB, nearly four times larger, and it added faint smudges around the sharp edges. Format is not about better or worse. It is about matching the tool to the image.
Step 3: Resize before you compress
Format is half the win. Dimensions are the other half. A blog column is rarely wider than 800 pixels and a full-bleed hero rarely needs more than 1600 to 2000. A photo straight off a phone is 4000+ pixels wide, which means you are shipping four times the width and up to sixteen times the pixels that will ever be displayed.
So the order of operations matters: resize down to the largest size the page will show, then save in the right format. Resizing a 4000 pixel photo to 1600 typically cuts the file by 70 to 80 percent before compression even starts.
Step 4: Pick your format in five seconds
When you are unsure, this is the whole decision:
Step 5: Convert, then verify it worked
You do not need Photoshop. Squoosh is a free tool from Google that runs entirely in your browser: drag an image in, pick WebP on the right side, set quality around 80, watch the live before and after preview, and download. It shows the exact file size as you move the slider, so you can find the point where the photo still looks right.
Then verify, because a fix you have not checked is a guess:
Right click the image on your live page and choose 'Open image in new tab'. The URL ending tells you what actually shipped.
Press F12, open the Network tab, filter by 'Img', and reload. Each image lists its real transferred size. Anything over 500 KB deserves a second look.
Run your page through PageSpeed Insights. If 'Serve images in next-gen formats' has disappeared from the suggestions, you are done.
The habits that keep it fixed
Do
Resize to the largest size the page will actually display, then compress.
Use quality 75 to 85 for photos. Below 70 artifacts show, above 90 the file balloons.
Check the final file size. A hero photo should land under 300 KB.
Keep one full-size original somewhere safe before you compress.
Don't
Upload straight from your phone. A 12 megapixel photo is 4000+ pixels wide and often 5 MB.
Save logos or screenshots as JPEG. Flat colors and text come out blurry and bigger.
Screenshot a photo to 'convert' it. You lose quality and keep the bloat.
Re-compress an already compressed file over and over. Quality only goes down.
Two footnotes. First, some platforms do this work for you: StoryPress, for example, routes every image through Cloudflare's image pipeline with format set to auto, so a visitor whose browser speaks WebP or AVIF gets the smaller file automatically even if you uploaded a JPEG. Uploading sensible sizes still matters, but the format conversion is handled. Second, if you want the deeper technical background, Google's own guide to choosing the right image format covers the edge cases we skipped.
“Same pixels, same screen, 8.5 times the download. Format is the cheapest speed upgrade your site will ever get.”
The best part of this fix is that it is permanent. A photo compressed once is compressed forever, no plugin to update, no subscription, no maintenance. Twenty minutes on your ten heaviest images this week will do more for your load time than any setting you could toggle.
One practical website guide, twice a week. No panic, no jargon.
)
How to Read an SEO Audit Report (Without Panicking)
Free SEO checkers hand out alarming numbers to everyone: a 64 with three critical errors is close to the median first result, not a five-alarm emergency. Those tools have a business model, and it is fear. Most warnings on the list are cosmetic, a handful genuinely cost you customers, and the score itself is not one of Google's ranking factors. What separates a calm site owner from a panicked one is knowing which five findings deserve a weekend and which thirty deserve a shrug. This guide translates the jargon, ranks the warnings by real-world damage, and gives you a 20-minute triage routine.